Published May/June 2021 issue
Available to view online at Better Living Magazine


Top left to right:
Wood play gym: Ebarza
Rattan crown: Tribe Dubai
Woven lions head: Martin & Ella
RuPaul book: The Book Depository
Lion Cushion: Nobodinoz @ Smallable

2nd line left to right:
Stripe towel: Liewood @ Marmarland
Magic banner: Seb & Charlie
Pink sheets: Swedish Linens @ Martin & Ella
Shell baseball cap: Liewood @ Marmarland
Hanging swing: Tiipii @ Tribe Dubai

Bottom line left to right:
Pink scooter: Birdie Kids @ Elli Junior
Kids rainbow poster: StudioLoco @Martin & Ella
Wooden mushrooms: Moon Picnic @ The Kids Collection
Wooden market cart: Hearth & Hand @ Target
Bunny lamp: Rose in April @ Bobby Rabbit
Giant octopus stuffed toy: Bigstuffed @ Smallable
Pink bike: Banwood @ Elli Junior
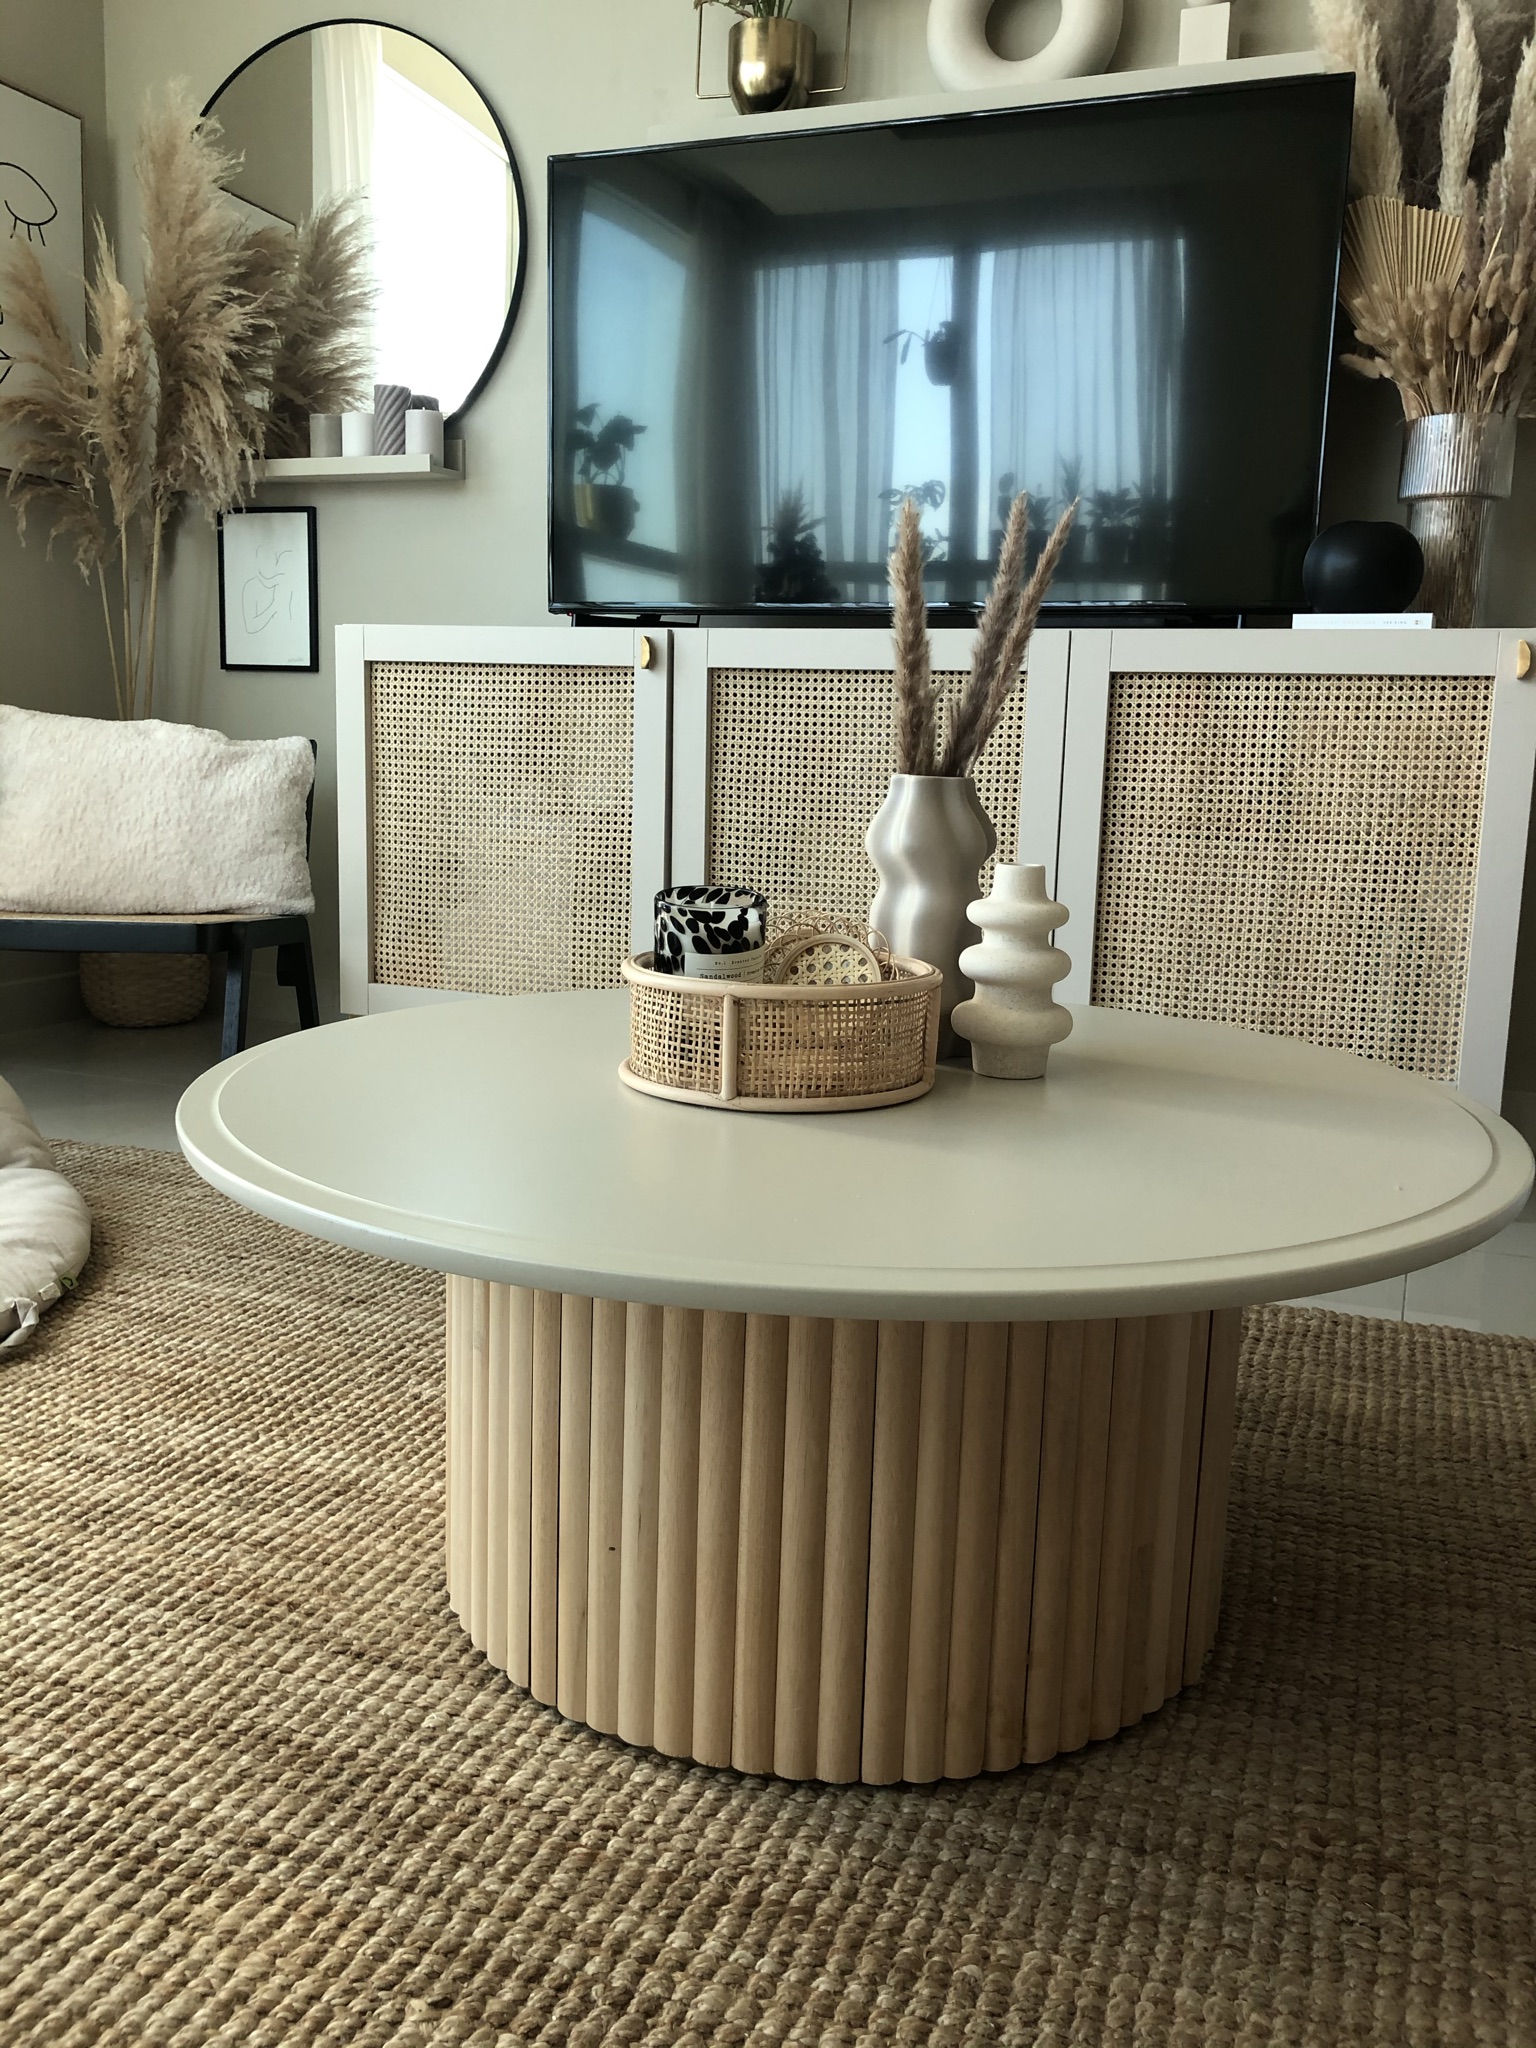
I had been searching for a beautiful coffee table to fit in with my interior décor and my budget for a while but just couldn’t find anything I was happy with. I came across a hack on Luke Arthur Wells Instagram which gave me an idea. He had made a fluted pedestal by using wooden dowels and some duct pipe. I loved the fluted look and decided to create my own coffee table version.
1) The planning stage. I drew up some ideas of how I wanted it to look. I wanted to create a round coffee table one thick leg in the centre as the base. I was trying to find something to use as the base and had several ideas:
- I could build a wooden structure and build the wooden dowels around it but sticking them to the wooden frame.
- I could find a cylindrical side table or coffee table and use that to build around.
- I could try to source one very wide thick duct pipe.
- If I couldn’t come to a conclusion for one thick base - I could have more than one leg and use those metal bins… I was thinking I could use the outer shell of a metal foot pedal bin as the legs and perhaps have an oval shape table with two legs… or I could use duct pipes for this.
For the table top. I planned to either have one cut from an ikea counter top or to find a second hand circular table and use the top of it for my table.
2) The decision: I spent weeks trying to source the perfect items online but decided I had to get out and about to try to find them… I took myself to ikea (of course). And it did not disappoint. After a long walk around, I found what was required beside the checkouts in Ikea (Abu Dhabi) in the bargain area. Hiding in this area I found the most perfect base for my table! It was a perfectly sized cylindrical coffee table at half its original price. I also found the perfect table top in the bargain area: removed its legs and helloooo round table top! I went from being deflated to delighted! I then popped to Ace Hardware and picked up everything I would need to make my coffee table dreams become reality…

What you will need:
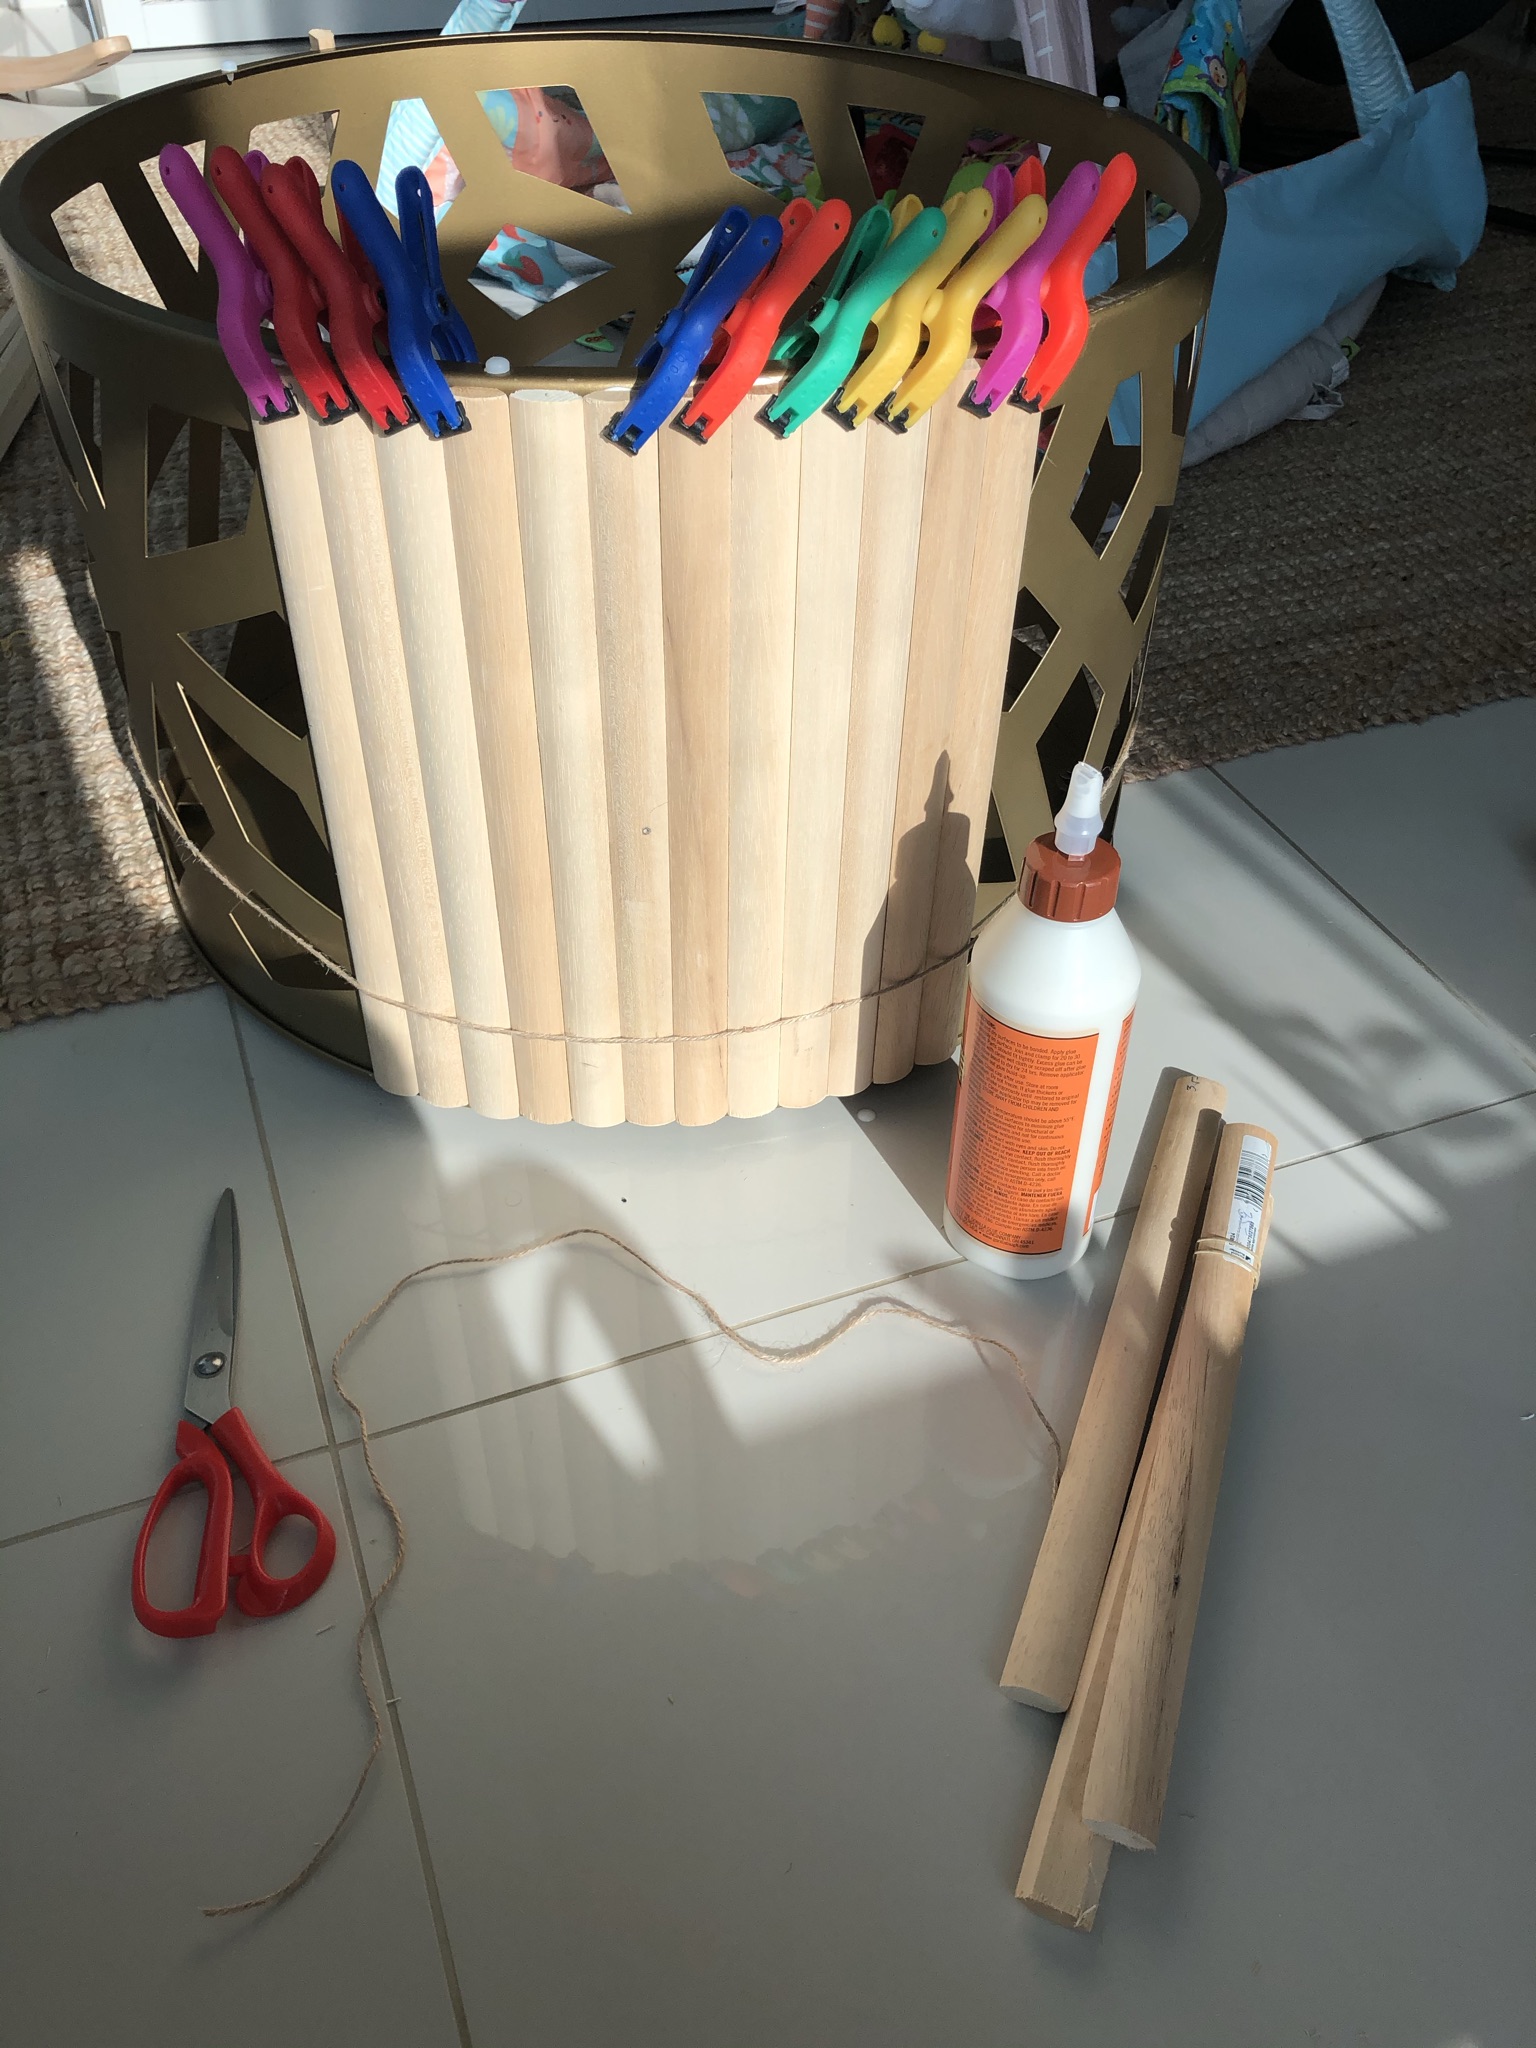
- Wooden dowels. Measure your base and measure the dowels to figure out how many you will need and what length you will need them cut too. We got ours cut to size in the store but you could also cut them yourself using a jigsaw or hand saw.
- Wood glue or I used Gorilla Glue
- Clamps
- String
- Off cuts of wood
- Masking tape
- Measuring tape
- Level
- Choice of base
- Choice of table top
How to:
1) Once you have all the dowels cut to size and ready to go; add wood glue to the back of the dowel and use a level to ensure you are adding sticking it in a straight line to the base.
2) Once you have placed it on the base – use clamps to secure it and repeat until you have them all stuck on. For us, we didn’t have enough clamps to stick them all on at once to we had to do it in stages of 5 dowels at a time, wait for the glue to dry and then add another five and so on. This meant it did take a good bit longer to complete. We also used string which we tied string tightly around the base to help stick the dowels down and keep them in place while they dried.

3) Once the base was complete we then used a measuring tape to figure out where the centre of the table top was in order to get the base glued in the correct place so that it wouldn’t look wonky! We then just used masking take to tape some off cuts of wood on the underside of the table top to create a slot to pop the base into so that we knew we were putting the base in the centre of the table top.


4) We used wood glue to stick the base to the top and left it to dry overnight.
5) And voila! My dream coffee table was complete! Turn it over and style it up! I chose not to paint mine as the natural wood looked great in my home. But if you wanted to paint it I would recommend using Frenchic paint (from @whenshabbymeetschic) and the Frenchic finishing coat for protection.
